What is this project?
Interested in establishing your own cloud development environment without any ongoing costs? This guide provides instructions on setting up your own office using Proxmox Data Center, a TrueNAS storage server, a Pfsense firewall server, and optionally, a FOG server. All components will be configured using physical hardware and open-source software, with no need for a subscription. Simply follow these steps to make it a reality! :)
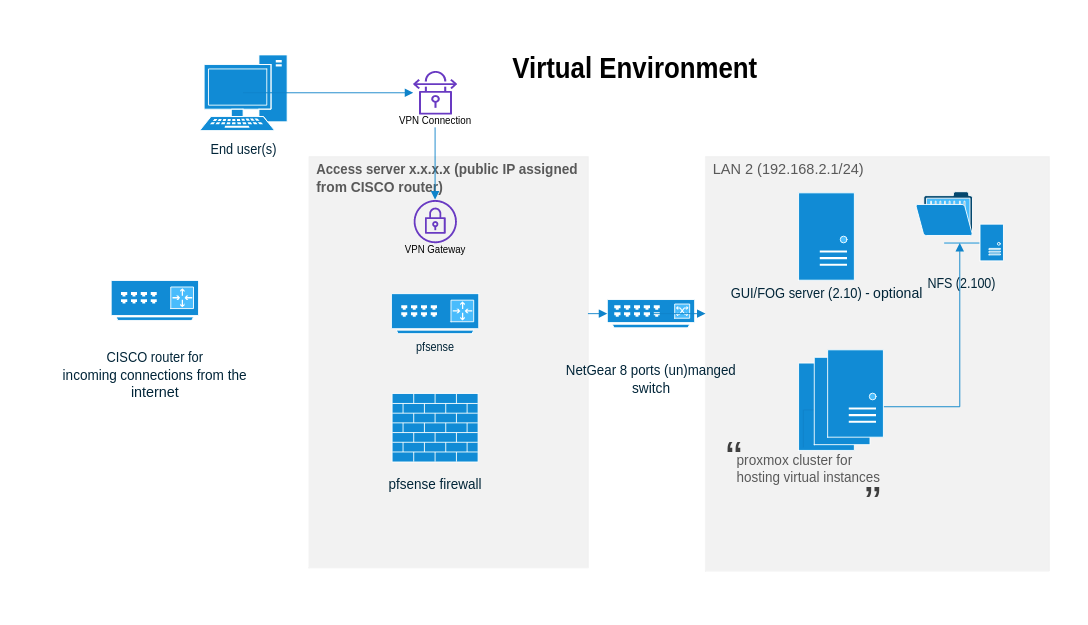
Graph
The diagram provides a comprehensive overview of the interactions among these components. The access server is assigned a public IP, while all the internal servers operate within a NAT network.
Prepare physical devices
I use old Dell OptiPlex 9020 for all the Desktop server. The market value for a renewed one is about $300 to $500. You could use any you like.
- 3 or more Desktops for proxmox nodes in Datacenter pool, one NIC card for each.
- 1 Desktop for pfsense, it must has 2 NIC card.
- 1 Desktop for extra remote storage, one NIC card for each, the disk space is better to be more than 1TB.
- 1 Netgear 5 port or 8 port switch. It doesn’t need to be managed switch. The market value for a new one is about $40. They are available on amazon.
- 5 one meter RJ45 network cable (cat 5 or 6 all good). 1 two meter RJ45 network cable.
- an old monitor.
- an old keyboard.
- an old mouse.
- 12 outlet Power Board.
Connect servers together
Connect the Dell machine’s NIC card to the Netgear switch using an RJ45 network cable. For the server that will be running pfSense, use one cable to link the device to the Netgear switch and another cable to connect it to an external CISCO router. Ensure that the Dell server can obtain a public IP address.
Finally, power on these machines.
Install proxmox cluster
- Copy Proxmox Virtual Environment to usb
1.1 get a usb stick
1.2 download Proxmox Virtual Environment
1.3 prepare usb downloader
lsblkfind usb partition like
/dev/sda, and if it mount on some mountpoint, unmount them.sudo umount /dev/sda1 sudo umount /dev/sda2 sudo umount /dev/sda3remove all partitions on
/dev/sda, and then add a new linux partition/dev/sda1sudo fdisk /dev/sda : d : n : wnow copy proxmox iso to usb
sudo dd bs=4M if=proxmox-ve_<version>.iso of=/dev/sda1 conv=fdatasync status=progress
Now, take the USB stick and insert it into one of the Dell 9020 servers, and then press F12 to access the boot menu.
Following the instruction and install the system. For the reference of how to install proxmox, you could follow this video.
Install pfsense
- Copy pfsense to USB stick
Download pfsense and copy it to the USB stick as shown in the previous step.
- Following the instruction and install the system. For the reference of how to install pfsense, you could follow this video.
Install TrueNAS storage server
- Copy pfsense to usb stick
Download pfsense and copy it to the USB stick as shown in the previous step.
- Following the instruction and install the system. For the reference of how to install pfsense, you could follow this video.
Configure network setting in pfsense
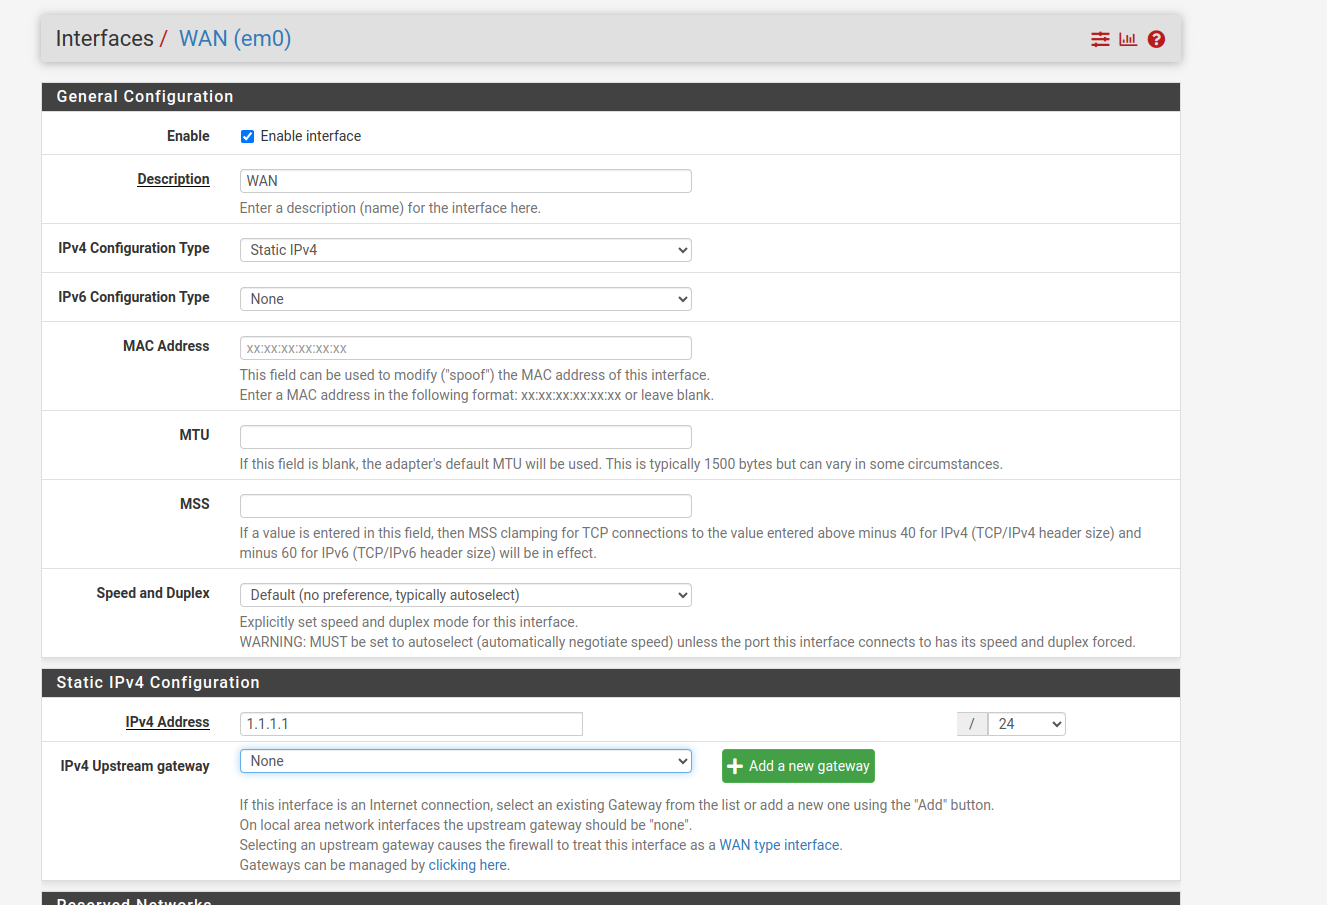
add a new WAN interface.
Ensure that you configure the IPv4 address to match the public IP allocated to you by the upstream router. The gateway of upstream router is usually x.x.x.1.
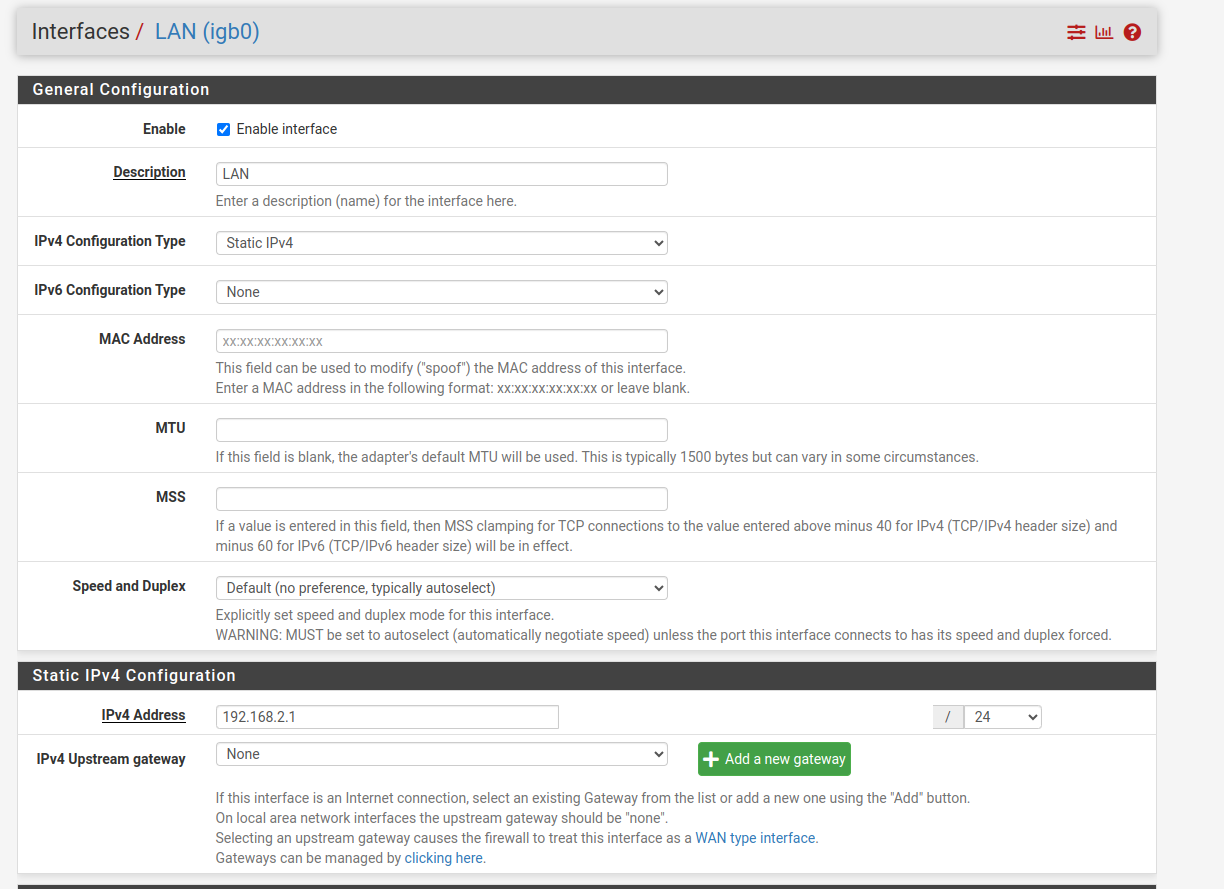
add a new LAN interface
Configure IPv4 Address.
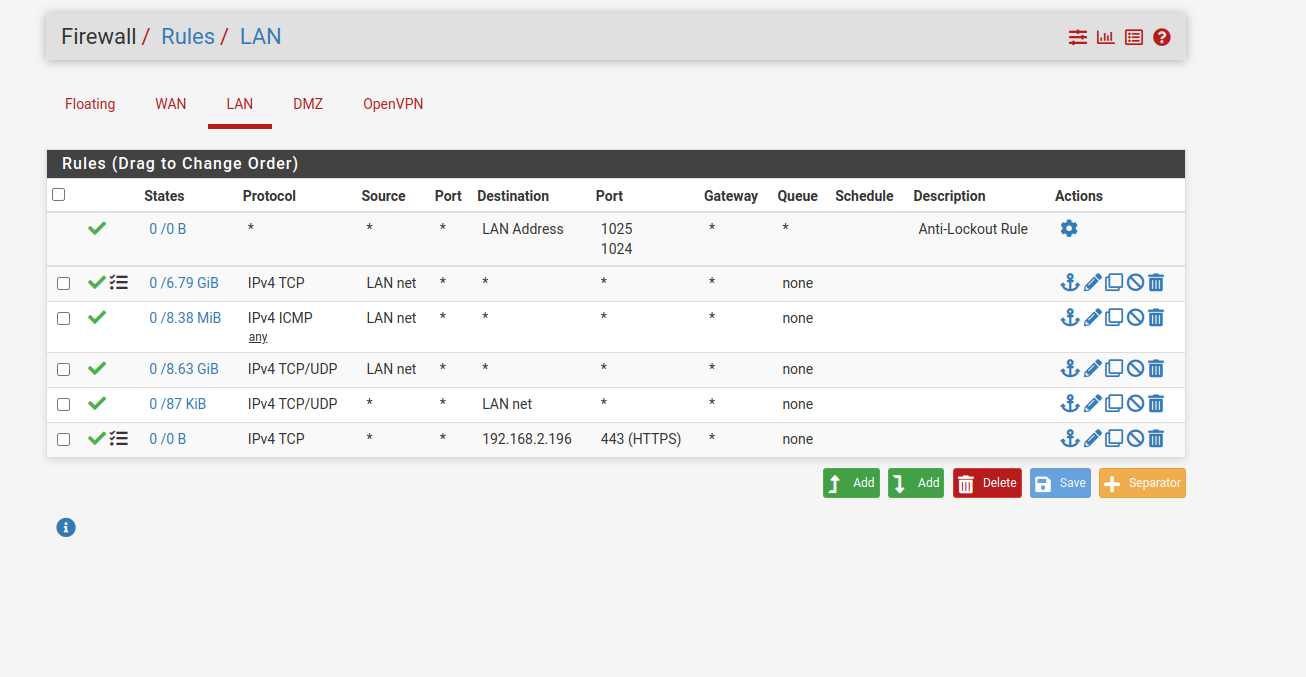
add a new LAN firewall rules
Add acme certificate on the pfsense website
It is important to secure your requests when visiting the admin panel with admin credentials. Let’s put a certificate on the page.
ssh into the pfsense node, and input 8 to get into shell.
channel_setup_fwd_listener_tcpip: cannot listen to port: 5555
Could not request local forwarding.
X11 forwarding request failed on channel 0
pfSense - Netgate Device ID: 940d49fde6bb5c98e734

*** Welcome to pfSense 2.6.0-RELEASE (amd64) on pfSense ***

 WAN (wan)       -> em0        -> v4: x.x.x.x/24
 LAN (lan)       -> igb0       -> v4: 192.168.2.1/24
 DMZ (opt1)      -> igb0.1     -> v4: 10.0.0.1/24

 0) Logout (SSH only)                  9) pfTop
 1) Assign Interfaces                 10) Filter Logs
 2) Set interface(s) IP address       11) Restart webConfigurator
 3) Reset webConfigurator password    12) PHP shell + pfSense tools
 4) Reset to factory defaults         13) Update from console
 5) Reboot system                     14) Disable Secure Shell (sshd)
 6) Halt system                       15) Restore recent configuration
 7) Ping host                         16) Restart PHP-FPM
 8) Shell
paste the following code in /etc/rc.restart_webgui.
#!/usr/local/bin/php-cgi -f
<?php
/*
 * rc.restart_webgui
 *
 * part of pfSense (https://www.pfsense.org)
 * Copyright (c) 2004-2013 BSD Perimeter
 * Copyright (c) 2013-2016 Electric Sheep Fencing
 * Copyright (c) 2014-2022 Rubicon Communications, LLC (Netgate)
 * All rights reserved.
 *
 * Licensed under the Apache License, Version 2.0 (the "License");
 * you may not use this file except in compliance with the License.
 * You may obtain a copy of the License at
 *
 * http://www.apache.org/licenses/LICENSE-2.0
 *
 * Unless required by applicable law or agreed to in writing, software
 * distributed under the License is distributed on an "AS IS" BASIS,
 * WITHOUT WARRANTIES OR CONDITIONS OF ANY KIND, either express or implied.
 * See the License for the specific language governing permissions and
 * limitations under the License.
 */

require_once("config.inc");
require_once("functions.inc");
require_once("shaper.inc");
require_once("captiveportal.inc");
require_once("rrd.inc");

echo "Restarting webConfigurator...";

/* Stop all running nginx processes */
$pidfiles = glob("{$g['varrun_path']}/nginx*.pid");

foreach ($pidfiles as $pidfile) {
	killbypid($pidfile);
}

system_webgui_start();

captiveportal_init_webgui();

enable_rrd_graphing();

echo " done.\n\n";

?>
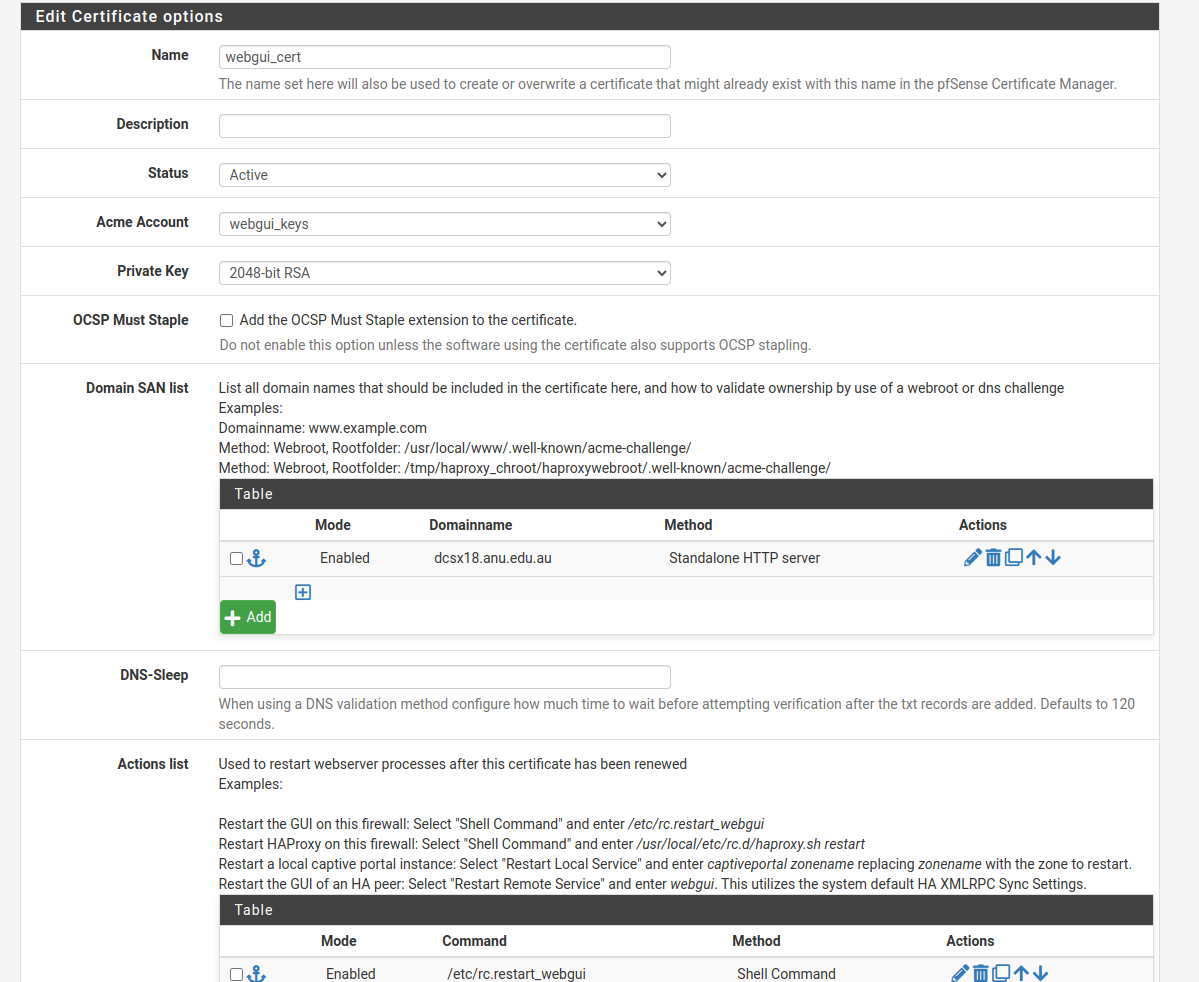
Configure the acme certificate as below.
So far the little office lab is set up ready.
Credit: Photo captured of the actual office laboratory setup.